Welcome to the anchor leg! Are you geared for crossing the line today? Till now, we have successfully configured our Google Analytics account (Part 1) as well as our Salesforce org (Part 2) , and also created the custom variables (Part 3) in the previous posts. Let’s now put the final piece of the puzzle together and create the custom dimensions, and once done, we will then go about tracking the most popular Accounts based on page views, using what we have learnt so far.
Custom dimensions allow you to combine Google Analytics data with non-Google Analytics data, e.g. CRM data. For example, if you want to store the Geo-location of signed-in users in your CRM system, you could combine this information with your Google Analytics data to see Page-views by Geo-location.
There are 20 indices available for different custom dimensions in each property. Premium accounts have 200 indices available for custom dimensions. Custom dimensions cannot be deleted, but you can disable them.

Every custom dimension has got four scopes: Hit, Session, User and Product. Hit is a call to the GA/UA server by a JavaScript library (like ga.js, analytics.js etc). A hit can be a pageview, screenview, event, transactions, item etc.
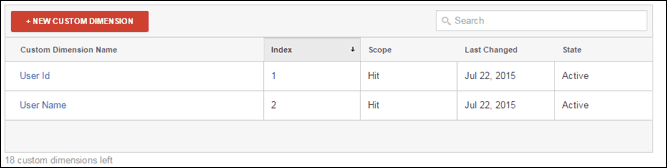
You have now created your first custom dimension as shown below:
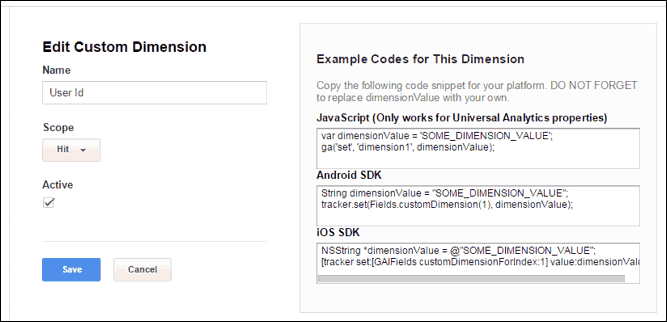
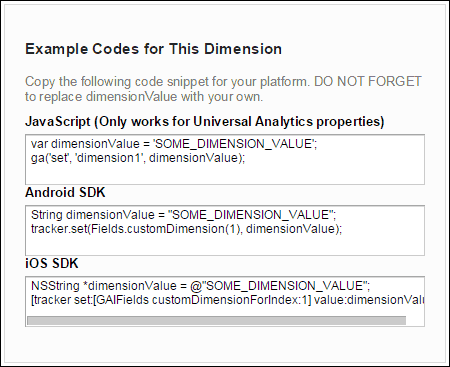
Note: You can get these example codes by clicking on the name of your custom dimension.
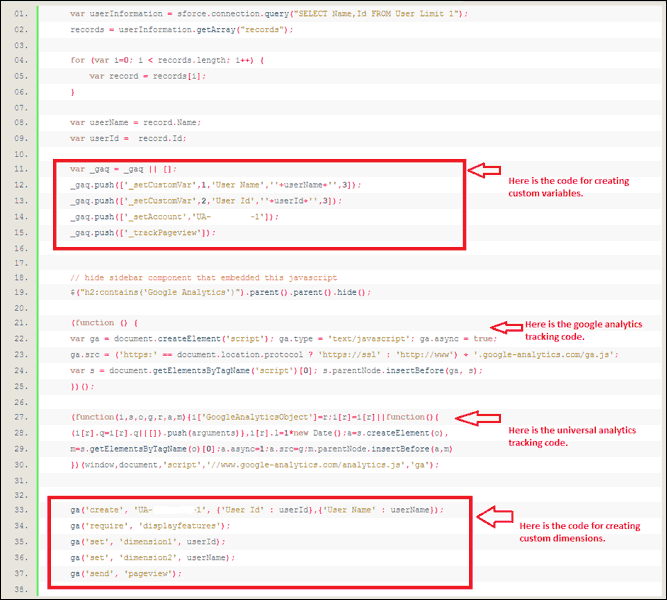
My final google analytics script including custom variables and custom dimensions can be seen below:
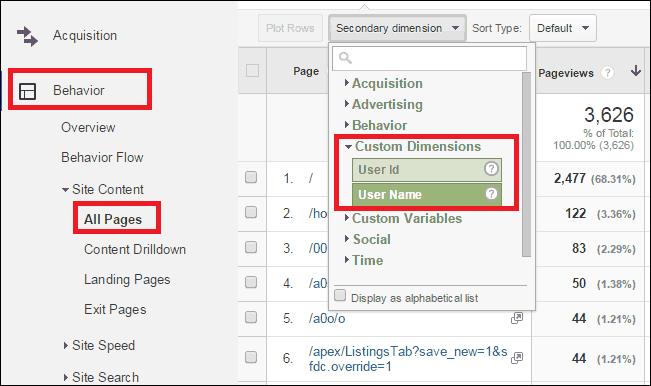
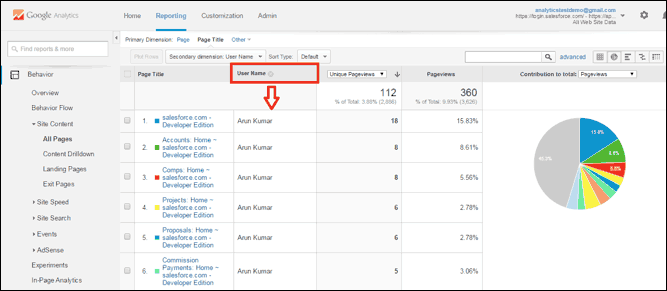
You can also see the custom dimensions in the Google analytics site, by going to Reporting Tab > Behavior > Site Content > All Pages and choosing the secondary dimension as given below:
After choosing the custom dimension User Name, it looks something like:
Go to Reporting Tab > Behavior > Site Content > All Pages and filter out as shown below:
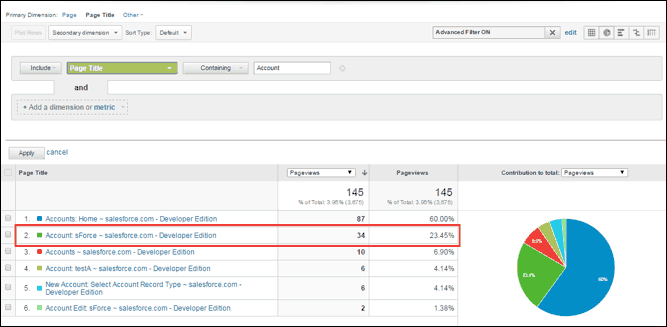
Tadaa! You now have your most popular accounts based on page views! You can use similar logic for other use cases and in turn, get more out of your Salesforce org, just as I promised.
Analyzing Salesforce data with Google Analytics: Part 1, Part 2, Part 3
Written by Arun Kumar Bharati, Salesforce Developer at Eternus Solutions
Creating Custom Dimensions
Custom dimensions allow you to combine Google Analytics data with non-Google Analytics data, e.g. CRM data. For example, if you want to store the Geo-location of signed-in users in your CRM system, you could combine this information with your Google Analytics data to see Page-views by Geo-location.
Limits of custom dimensions
There are 20 indices available for different custom dimensions in each property. Premium accounts have 200 indices available for custom dimensions. Custom dimensions cannot be deleted, but you can disable them.
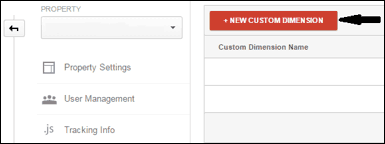
Step 1
Go to the Admin section of your Google analytics account and then click on the Custom Dimensions link under the Custom Definitions drop down menu:Step 2
Click on the New Custom Dimension button.Step 3
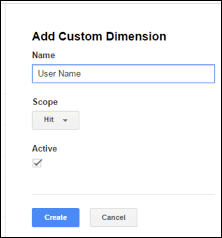
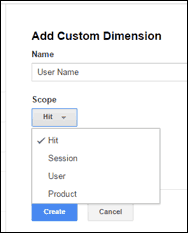
Enter the name of your new custom dimension, select its scope as Hit and then click on the create button.Every custom dimension has got four scopes: Hit, Session, User and Product. Hit is a call to the GA/UA server by a JavaScript library (like ga.js, analytics.js etc). A hit can be a pageview, screenview, event, transactions, item etc.
- When a custom dimension has hit level scope, its value is only applied to the hit with which the value was sent
- When a custom dimension has Session level scope, its value is applied to all the hits in the current web session
- When a custom dimension has User level scope, its value is only applied to all the hits in the current and future web sessions of a user, until the value changes or the custom dimension is made inactive.
Step 4
Once you click on the create button, you will be shown the sample code for your custom dimension. Just click on the Done button for now.You have now created your first custom dimension as shown below:
Step 5
You will need the help of a developer now. Forward the following example code for your custom dimension to your developer, so that he can use the same to track your website.Note: You can get these example codes by clicking on the name of your custom dimension.
My Final Google Analytics Script!!!
My final google analytics script including custom variables and custom dimensions can be seen below:
You can also see the custom dimensions in the Google analytics site, by going to Reporting Tab > Behavior > Site Content > All Pages and choosing the secondary dimension as given below:
After choosing the custom dimension User Name, it looks something like:
Tracking the Most Popular Accounts based on Page Views
Go to Reporting Tab > Behavior > Site Content > All Pages and filter out as shown below:
Tadaa! You now have your most popular accounts based on page views! You can use similar logic for other use cases and in turn, get more out of your Salesforce org, just as I promised.
Analyzing Salesforce data with Google Analytics: Part 1, Part 2, Part 3
Written by Arun Kumar Bharati, Salesforce Developer at Eternus Solutions
No comments:
Post a Comment